 |
 |
This install takes 20 - 30 minutes and a little bit of patience.
Click on the images for larger views. |
Step 1: Getting the required items together
This install requires:
- 1 Bimmian Xenon Interior Light Bulb Kit
- Small Flat Screwdriver
- A BMW M3 (E46).
- 20 - 30 minutes of free time.
|
 |

Bulb Set |
Step 2: Passenger's Foot well: Removing the light housing
- Locate the passenger foot well light housing.
- Pop the housing out by prying right side of the housing with a small flat screwdriver.
- Pull the housing out.
|

Light Location

Clip Released |
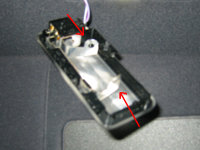
Step 3: Passenger's Foot well: Exposing the bulb
- To make life easier you may want to unplug the housing from the car (see image).
- Slide the metal plate at the rear of the housing to the side (see arrows on the plate itself) and lift the plate off the housing to expose the bulb.
|

Power Plug

Backing Plate

Stock Blub |
Step 4: Passenger's Foot well: Replacing the bulb
- Carefully remove the bulb from the retaining clips.
- Since this is a Bimmian product, this means that it will not really fit right. The replacement bulbs are a little bit shorter than stock and require that you slightly bend the retaining clip(s) to make sure the new bulb stays in (see images).
- Once the bulb is in place, replace the metal back plate by reversing the steps you took to remove it.
- Plug the light housing back in.
- Replace the housing into the car by snapping it back into place.
|

Bending the Clip

Bimmian Bulb a Bit Short

Bimmian Bulb In Place |
Step 5: Driver's Foot well
- Locate the passenger foot well light housing.
- Pop the housing out by prying the front side of the housing with a small flat screwdriver (just like the passenger side light).
- Pull the housing out.
- Follow the same steps for the driver's side as you did for the passenger's side to replace the bulb and re-install the housing.
|

Light Location

Housing Released |
Step 6: Vanity Mirror Lights: Removing the light housing
- Use your fingers to pull down the back edge of the vanity mirror light (see image).
- Pull the housing down (see image).
- Remove the stock bulb.
|

Prying the Edge

Released Housing |
Step 7: Vanity Mirror Lights: Installing the new bulb
- The Bimmian bulb fits even worse here than in the foot wells.
- Use your fingers to gently push both contact tabs in so that they securely hold the bulb (see image).
- Once the bulb is securely in place, pop the housing back into place - repeat for the other side.
|
Adjusting the Tabs |
Step 8: Overhead Light: Removing the light housing
- Pry the front edge of the overhead light open with a small flat screwdriver.
- Pull the light housing down and disconnect the wiring harness (press tabs at the sides of the plug to release).
|

Prying the Edge

Releasing the harness |
Step 9: Overhead Light: Replacing the bulbs
- Remove the three bulb sockets by turning each counterclockwise and pulling them out of the light housing (see image).
- Pull the bulbs out of the sockets (the bulb just pulls straight out). Note the tabs inside the socket (see image)
- Insert new bulbs in the sockets.
- Insert the bulb/socket into the openings in the housing, press down and turn clockwise to lock the socket in place. Repeat for all 3 lights.
- Plug the wiring harness back into the housing.
- Line up the rear edge of the housing (edge toward the windshield) in the opening in the head liner and then snap the front edge in by pushing it upwards.
|

Removing the Bulb Sockets

Exposed Sockets |
Step 10: Rear Pillar Lights: Removing the light housing
- Pry the font edge of the light housing with a small flat screwdriver - this is a little tight so be careful not to damage the housing.
- Pull the housing out of the pillar and unplug the harness.
|

Prying the Edge

Disconnecting Harness |
Step 11: Rear Pillar Lights: Removing and Replacing the bulbs
- Remove the two bulb sockets by turning each counterclockwise and pulling them out of the light housing (see image).
- Pull the bulbs out of the sockets (the bulb just pulls straight out).
- Insert new bulbs in the sockets.
- Insert the bulb/socket into the openings in the housing, press down and turn clockwise to lock the socket in place. Repeat for both lights in each housing.
- Plug the wiring harness back into the housing.
- Line up the rear edge of the housing (edge toward the back window) in the pillar and then snap the front edge into place. Repeat for other side.
|

Socket Locations |

|


